1963 Cub Cadet Original
The real start to the entire collection was with this tractor. This was the first one that was just for collecting, although it did and still sees a good amount of work.
The tractor was saved a while back from a shed where we were helping a guy move stuff out. The original owner was going to scrape it, so since we had interest in it they let us take it home with us.
At this time I was really small, so I don't remember much about fixing it up. However, I do remember there were quite a few things wrong.
Starting at the front, the grill was hacked up from someone extending the exhaust out the front. That was not the worst of it though, since the grill housing itself had the entire upper piece busted off and missing. The hood was also bent in at the front, so we suspect someone hit a fairly large tree. Going to the motor, someone rigged a plastic tank as the gas tank. The reason for this was the original gas tank had pin holes in it, so they improvised. One of the last things wrong was in the transmission. It had to be taken apart since there were many teeth broken off of 2nd gear. One little thing that had to be fixed was where the front axle mounts to the frame, that part was worn severely. For free, you can't complain too much about it.
The good parts of the tractor were definitely more obvious than the little things wrong. To start, the motor only required a carburetor cleaning, points, a new spark plug, and a battery to run. It also did not smoke a bit, and it continues to not use any oil to this day. The rest of the tractor was all there and not hacked up.
Being the first tractor collected and complete enough to restore, this would become the first restoration we would undertake. This will also probably be the easiest one we will every do since it was half restored to get it working when we brought it home.
I don't have any pictures from when we first got it home, but here is the earliest one I have:
The tractor was saved a while back from a shed where we were helping a guy move stuff out. The original owner was going to scrape it, so since we had interest in it they let us take it home with us.
At this time I was really small, so I don't remember much about fixing it up. However, I do remember there were quite a few things wrong.
Starting at the front, the grill was hacked up from someone extending the exhaust out the front. That was not the worst of it though, since the grill housing itself had the entire upper piece busted off and missing. The hood was also bent in at the front, so we suspect someone hit a fairly large tree. Going to the motor, someone rigged a plastic tank as the gas tank. The reason for this was the original gas tank had pin holes in it, so they improvised. One of the last things wrong was in the transmission. It had to be taken apart since there were many teeth broken off of 2nd gear. One little thing that had to be fixed was where the front axle mounts to the frame, that part was worn severely. For free, you can't complain too much about it.
The good parts of the tractor were definitely more obvious than the little things wrong. To start, the motor only required a carburetor cleaning, points, a new spark plug, and a battery to run. It also did not smoke a bit, and it continues to not use any oil to this day. The rest of the tractor was all there and not hacked up.
Being the first tractor collected and complete enough to restore, this would become the first restoration we would undertake. This will also probably be the easiest one we will every do since it was half restored to get it working when we brought it home.
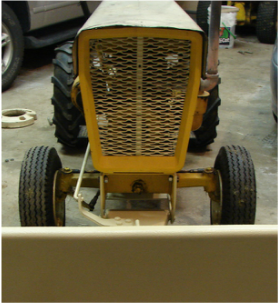
I don't have any pictures from when we first got it home, but here is the earliest one I have:

As you can see, the dash, transmission and a few other parts were painted since they needed it. We also installed the stack on the exhaust. Also note the orange body filler around the hood bolts. This would not be the last of body work on the hood.
The rear ag tires were also added by us. They were sitting in the shed for years after they didn't make a difference with plowing for the 1250. They were practically brand new, including the paint on the wheels. We also had to put new front tires on.
The rear ag tires were also added by us. They were sitting in the shed for years after they didn't make a difference with plowing for the 1250. They were practically brand new, including the paint on the wheels. We also had to put new front tires on.
Restoration
Before tearing into the entire tractor to restore it, I decided to do the hardest part first. By far the piece that need the most work was the hood.
In the picture above, you can see how the front of the one side of the front of the hood is dented up compared to the other side. Most of the work to the hood would have to do with this side.
Before I could do any body work, I first sandblasted the hood. I didn't blast the logo off since I wanted to make sure the decals I would later get were close to the original logo.
Before I could do any body work, I first sandblasted the hood. I didn't blast the logo off since I wanted to make sure the decals I would later get were close to the original logo.
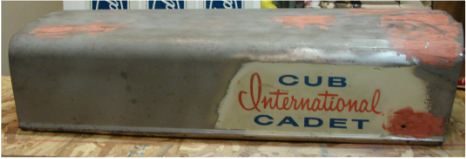
The picture above is a little later in the process. After blasting, I started in the middle of the hood with hitting dents out and filling it with body filler. After some work was done there, I moved to the side shown in the picture above. Where the curved part of the hood is toward the front, there was a very deep dent that probably bubbled up as a result of someone hitting a tree. The dent was so deep it could not be hit back in. I ended up cutting the dent with a disc cutter down the middle, then hitting it in so it was flush. I then took a filler compound to fill in the cut, then took body filler over the area to finish it off. This area is the place in the photo at the front of the hood where it curves down. The body filler shows where the dent was.
After fixing the big dent, I had to address the curve at the very front of the hood. When looking at the front of the tractor, the curve of the hood at the side of the hood with the dent was larger and looked all messed up compared to the other side. In order to get the bad side looking like the other, I had to somehow make something I could use to form the curve back to what it originally was.
I ended up using a piece of 1 inch flat stock to make a form. By heating it up, I was able to hit it while inside the good curved side to make a form. Then, I put this form on the other side and got to work.
After heating the the hood and hitting it to for it to the flat stock form, the curves on both sides looked the same. Now I took more time to apply yet more body filler to finish of the hood. Today you can still see some little dents and dings in the hood, but believe me when I say it is much better than it was before.
When work on the hood was mostly complete, I then started on the rest of the tractor. There was nothing complicated with taking it apart, since nothing was hardly rusted.
After everything was apart, I started taking the paint of the engine. With the tin off, I used an abrasive disk mounted on an air tool instead of sand blasting. Before priming the block, the front oil seal was replaced. Other than that, the engine wasn't touched as far as gaskets since opening it up would have cost more than what it was worth.

|

|
After priming with a high temp primer, the top coat went on.
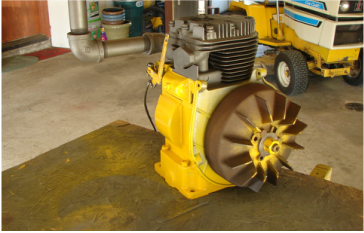
The cylinder head and fins were only painted with a very high temp paint used on car exhaust headers. I will have a page on this paint in the How-Tos. Most of this is covered by yellow tin anyway except for the very front. I thought that by not putting yellow on the fins this would aid in cooling the engine.
Next was the chassis and everything else. Sand blasting went fairly easy, although I learned the blaster we were using was too small since it took forever to get all the paint off.
Painting was also straight forward. One thing we had to come up with was something to hold and move the transmission. With the way Original transmissions are bolted to the frame, we came up with a simple dolly to hold the front up.

I had some old ag tires that somehow manage to hold air. This was so I didn't have to worry about covering the nice tires that would go on it after paint. The dolly was made out of a piece of angle and a caster wheel.
With the trans painted, the frame and trans were bolted together.
With the trans painted, the frame and trans were bolted together.

At this point it was a matter of painting some other small things so everything could be put back together.
Everything was done in time so it could help with spring plowing!
Everything was done in time so it could help with spring plowing!

I added the sleeve hitch when I was mounting a snow plow to it. I will have a page on that set up soon.
After the picture above, I added a grill emblem and shifter knob. I have the original grill emblem and need to fix the one corner. All it needs is paint now. I will post about it here when I get it done.
Later I picked up a fairly nice pair of hubcaps that were first put on since I didn't know what to put them on. Now I think they found a permanent home on it!
If you have any questions or comments, just let me know with the email in the contact link.
