1968 Cadet 60
While this is the fourth 60 we have bought, it is currently the only one that is in running condition. It will most likely remain that way for quite some time, unless we come across another one in similar shape.
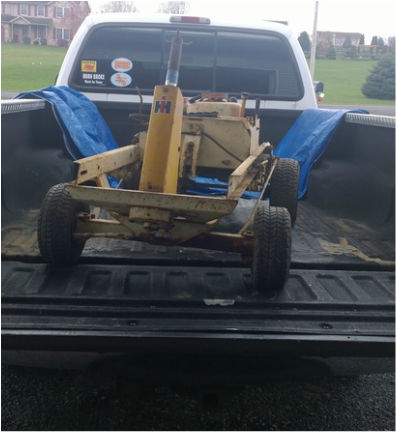
The 60 was found through a Craigslist ad in a town that was 2 and a half hours away. Since we really wanted to finally have one that was at least complete and had a chance of running, unlike the previous ones, we decided to check it out. In the ad the owner said it was in pieces, and some pictures that he sent showed that. This really was not an issue since having the body off would help us later when trying to work on it. After meeting with the owner, who was real easy to deal with and even gave a background on the rider, we headed 2 hours back home with the rider frame in the back and the body plus misc. pieces inside.
The 60 was found through a Craigslist ad in a town that was 2 and a half hours away. Since we really wanted to finally have one that was at least complete and had a chance of running, unlike the previous ones, we decided to check it out. In the ad the owner said it was in pieces, and some pictures that he sent showed that. This really was not an issue since having the body off would help us later when trying to work on it. After meeting with the owner, who was real easy to deal with and even gave a background on the rider, we headed 2 hours back home with the rider frame in the back and the body plus misc. pieces inside.
|
|

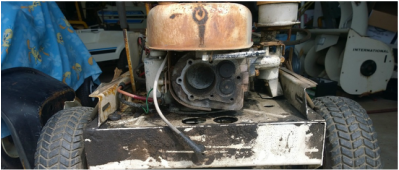
As soon as we got home, we unloaded the rider and quickly started working. The first thing we needed to do was get the motor unstuck. An issue that was discovered was surface rust on the cylinder wall. This happened since the cylinder head was already off, being taken off by the owner before the previous owner.
A few taps on the piston with a wood block and hammer got the motor unstuck. We happened to have a simple engine hone that goes on the end of an electric drill, which resolved the rust issue nicely. After cleaning the engine head surfaces, the head went on with a new head gasket we had. The engine was spun over a few times to check for compression, and it seemed to have really strong compression.
The next issue that needed attention was no spark. The flywheel was removed to get to the points which were mostly the problem. That ended up being the issue, so we installed new points and condenser we happened to have on the shelf. With the flywheel back on, the motor now had strong spark. To end the day on a high note we tested the engine to see if it would run on starter fluid. To our amazement it did, giving us the approval to continue fixing it so it could fully run and drive.
In order for it to run on its own, the carburetor needed attention. I thought it would be as simple as rebuilding it like usual since it had been sitting. After opening it up, however, I discovered what looked like a combination of mud and rust in the bowl of the carburetor. The intake pipes also had corrosion and what looked (and smelled) like some form of mold. I still tried to take the whole thing apart, but one of the adjustment screws would not budge and the pin that holds the float in would not come out. The float itself also looked like the bottom half was missing, so it really was not worth trying to rebuild. It just so happened (again) we had the exact same carburetor in a big tub full of misc. carburetors. This one was in really nice shape, so we just had to get a rebuild kit and mount it on.
The original intake and air cleaner elbows bolted to the carburetor cleaned up nicely, and new gaskets were installed to complete the assembly. After mounting the carburetor, the gas tank was mounted. New fuel hoses were installed, making the motor ready to run. The first fresh gas in years was poured in the tank, and no leaks appeared anywhere (the inside of the gas tank was already spotless). The moment of truth came, and after only a couple turns by the starter, the engine roared to life. In the few minutes we ran it the first time, the exhaust smoke began to clear and the engine sounded as strong as anything. The oil was changed to get out any water, which there was a little bit even at the second oil change, and sludge in the engine. During the third start of the engine after the second oil change, we decided to see if by chance the thing would move. Even though the pedals were not hooked up, the rods that connect to the pedals were still there and could be pulled. It surprisingly went forward and back in all gears, making us even more anxious to drive it.
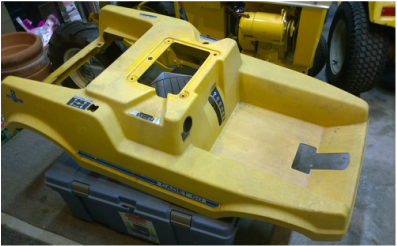
From here it was as simple as putting the rest of it back together the next day. A new chain was installed first, made easier by the absence of the body. The fiberglass body was placed over the frame next, with the ignition switch, throttle lever, and feeding the pedals through the frame completed before the body was mounted. The pedals were mounted to the frame, then connected to the rods that go to the rear of the rider. Another steering wheel from another 60 was mounted since the original was cut by the previous owner in order to remove the body. I saw why this was necessary when trying to remove the remaining piece of the wheel, which took a large torch set, a very large amount of penetrating oil, and quite a few hours to attempt to remove. A different front and rear wheel replaced the old ones that had broken value stems. Some grease was added to the grease points, finally readying the 60 for its first drive in many years.
Below is a video of the Cadet running and driving, with a quick overview of its features:
A few taps on the piston with a wood block and hammer got the motor unstuck. We happened to have a simple engine hone that goes on the end of an electric drill, which resolved the rust issue nicely. After cleaning the engine head surfaces, the head went on with a new head gasket we had. The engine was spun over a few times to check for compression, and it seemed to have really strong compression.
The next issue that needed attention was no spark. The flywheel was removed to get to the points which were mostly the problem. That ended up being the issue, so we installed new points and condenser we happened to have on the shelf. With the flywheel back on, the motor now had strong spark. To end the day on a high note we tested the engine to see if it would run on starter fluid. To our amazement it did, giving us the approval to continue fixing it so it could fully run and drive.
In order for it to run on its own, the carburetor needed attention. I thought it would be as simple as rebuilding it like usual since it had been sitting. After opening it up, however, I discovered what looked like a combination of mud and rust in the bowl of the carburetor. The intake pipes also had corrosion and what looked (and smelled) like some form of mold. I still tried to take the whole thing apart, but one of the adjustment screws would not budge and the pin that holds the float in would not come out. The float itself also looked like the bottom half was missing, so it really was not worth trying to rebuild. It just so happened (again) we had the exact same carburetor in a big tub full of misc. carburetors. This one was in really nice shape, so we just had to get a rebuild kit and mount it on.
The original intake and air cleaner elbows bolted to the carburetor cleaned up nicely, and new gaskets were installed to complete the assembly. After mounting the carburetor, the gas tank was mounted. New fuel hoses were installed, making the motor ready to run. The first fresh gas in years was poured in the tank, and no leaks appeared anywhere (the inside of the gas tank was already spotless). The moment of truth came, and after only a couple turns by the starter, the engine roared to life. In the few minutes we ran it the first time, the exhaust smoke began to clear and the engine sounded as strong as anything. The oil was changed to get out any water, which there was a little bit even at the second oil change, and sludge in the engine. During the third start of the engine after the second oil change, we decided to see if by chance the thing would move. Even though the pedals were not hooked up, the rods that connect to the pedals were still there and could be pulled. It surprisingly went forward and back in all gears, making us even more anxious to drive it.
From here it was as simple as putting the rest of it back together the next day. A new chain was installed first, made easier by the absence of the body. The fiberglass body was placed over the frame next, with the ignition switch, throttle lever, and feeding the pedals through the frame completed before the body was mounted. The pedals were mounted to the frame, then connected to the rods that go to the rear of the rider. Another steering wheel from another 60 was mounted since the original was cut by the previous owner in order to remove the body. I saw why this was necessary when trying to remove the remaining piece of the wheel, which took a large torch set, a very large amount of penetrating oil, and quite a few hours to attempt to remove. A different front and rear wheel replaced the old ones that had broken value stems. Some grease was added to the grease points, finally readying the 60 for its first drive in many years.
Below is a video of the Cadet running and driving, with a quick overview of its features:
Note that at one point I said we got it from the original owner when that was actually a mistake. The story behind this is it was stored in a barn for 30 years by the original owner. It was then given to the second owner who lost interest in restoring it. From there the third owner, who is the one we bought it from, picked it and planned to restore it. I think it will now have a permanent place here like all our other purchases.
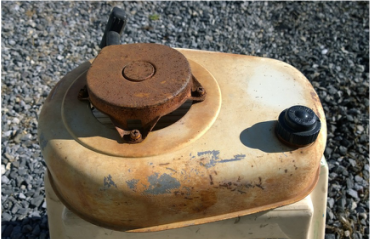
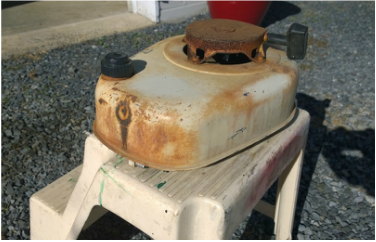
I did clean some of the parts up a little to make the most of what is already there. The first major thing that seemed like it could look better was the gas tank. The tank, which is part of the cover piece underneath the pull start, was heavily oxidized but had very little surface rust.
The tank started out like this:
|
|
Note the two really white spots were test spots to see if it came clean.
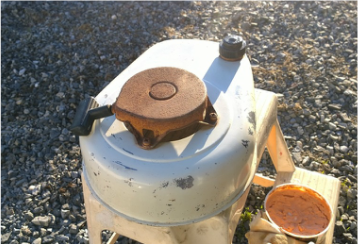
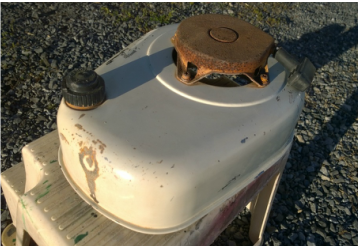
After a few hours, some rubbing compound, a few rags and a very large amount of elbow grease the tank turned out way better than I first expected:
After a few hours, some rubbing compound, a few rags and a very large amount of elbow grease the tank turned out way better than I first expected:
|
|
The only other cleaning besides lightly pressure washing the underside of the 60's frame was cleaning the mower deck. The deck was covered it about a quarter inch of grease in the back. At first it wasn't clear where this came from, but after seeing the camshaft seal leak a nice amount onto the axle, it became clear this was probably the source. It took a bit of de-greaser and a lot of scrubbing, but in the end it made the deck very show worthy:
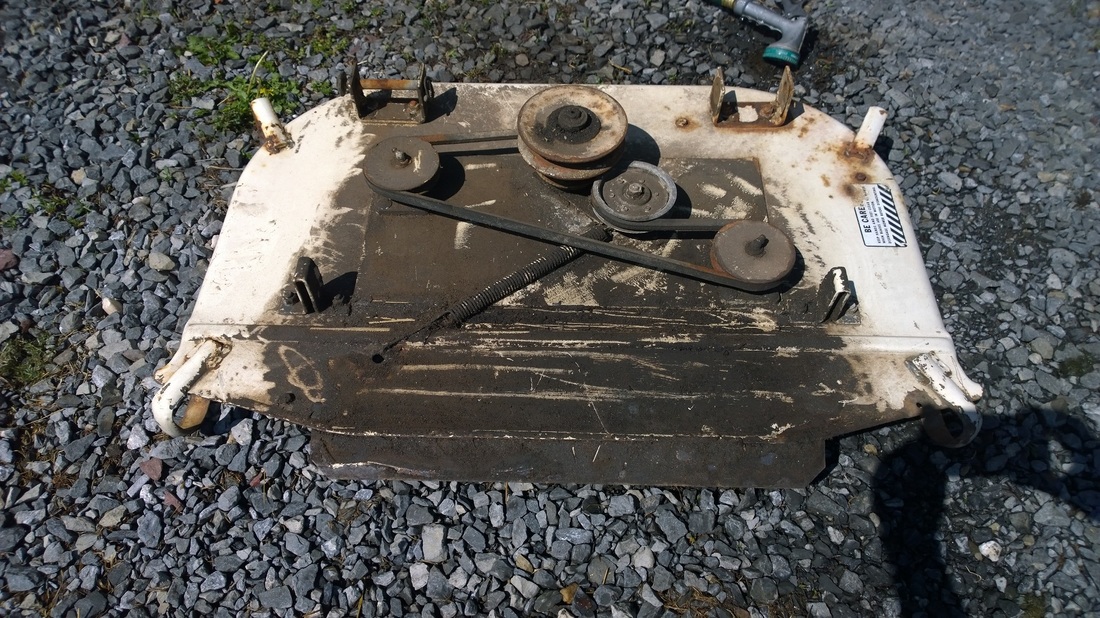
After scraping some grease off.
|
After picture to come soon...
|
In my mind there is still a little cleaning to do before its first show debut in May, but of course I always try to clean every little thing possible when it may not be necessary. It will certainly draw attention and be a very cool piece even in the shape it was before we started cleaning it.

The 60 at a show with era correct Parker sweeper and push blade sitting in front
